Dynamic Salesforce Report from Custom Button
I recently attended the Buffalo Salesforce User Group meeting. During the session a guest speaker conducted a demo of some development he did for his company’s production Salesforce org.
One of the items he touched on that spurred a lot of discussion was a custom button he built to pass a value to a report from a detail page of a given record. The resulting discussion was surprising because I really didn’t know that so many admins were unaware of the benefits of creating these custom buttons. And, after participating in the discussion, I thought that this would be a great topic for a blog post because there is so much that you can do if you understand this relatively simple trick.
Anyone familiar with the standard Salesforce reporting engine is aware that you can create custom reports and specify filters or criteria for the specific data, which should be displayed. These filters are displayed at the top of the screen above the report data itself and below the various reporting options. Please see the screenshot below:
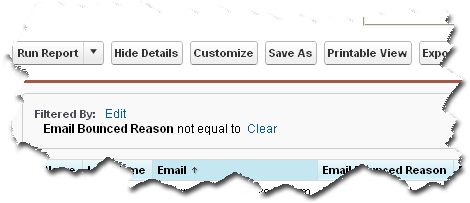
What you may not know is that salesforce.com keeps a series of hidden fields in the HTML of the generated report page, which you can use to manipulate the resulting report data if you desire.
For the sake of a very simple demonstration, let’s say that you want to create a custom report to display all of the contacts for a specific account. Since these are standard objects you can follow right along with me as I build the report.
For those of you not using the new reporting engine I apologize. The steps I have written below will be slightly different for you but I think you will still be able to follow along.
Click the "Reports" tab then the "Create New Custom Report" button. Select a category of "Accounts & Contacts" and a report type of "Contacts & Accounts." Click the "Create" button. The resulting screen will display the available fields and some high level filters with some fields and filters defaulted for ease of use. As far as I’m concerned, the fields that have been predefined as columns for the report are fine.
At the top of the screen you will see a set of filters. From the "show" picklist select "All Accounts" and remove any predefined dates in the "Date Field" section. Then click the "Add" pick button within the filters section and choose "Field Filter" from the displayed drop down list.
You will see a new row of filter conditions that you can use for the report. Select "Account ID" from the first picklist option, Choose "equals" from the second picklist option and leave the third text field empty. Then click the "OK" button located on the left-hand side of the row. If you’ve been following along then your filters should look exactly like the screenshot below:
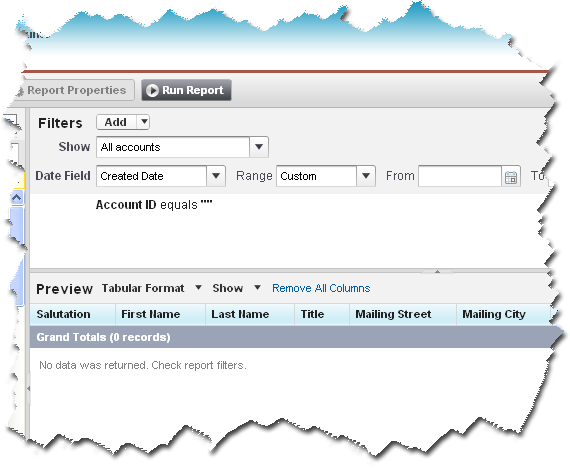
Now click the "Save" button, give the report a name like "Contacts For Account" and simply store it in the "My Custom Reports" folder or another folder to which you have access. Click the "Save & Run Report" button.
The resulting screen will be the report you built and there will be no data displayed in the results. This is accurate because you specified a filter for "Account Id" = "" and there are no Contacts under the account with the Id of null.
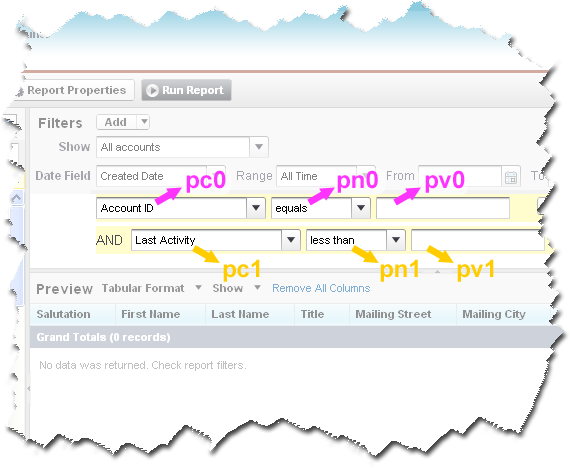
Now let’s get into the real meat of this topic... I mentioned earlier that the HTML behind any report page contains some hidden fields. These hidden fields correspond to the filters that you can define for any given report. There is a hidden field that corresponds to the field, a hidden field corresponding to the operator and a hidden field corresponding to the value. Since we are only using one set of filter criteria for this report, the hidden fields for each attribute are below:
Since you can add multiple filters to any given report, there are many hidden tags within the HTML of the report page that correspond to them all. The only difference is the number used at the end of each. More specifically, if you had a second condition/filter in our example report then the second condition would be stored in the pc1, pn1 & pv1 tags hidden in the page. Please see the illustration below:
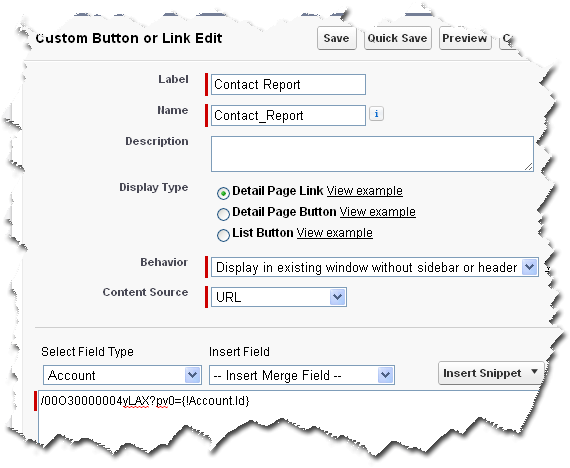
For the purposes of this post I do not want to dive into the variations in the hidden fields and how they correspond to various filters. I only want to focus on that last hidden tag, which corresponds to a value. In our case, this is the "pv0" tag. Remember, we have already saved a report and that the condition is set so that the value we seek in the resulting report is empty. What I want to do now is incorporate a custom button/link into the account detail page for my org so that I can link directly to the report we just made. And within that custom button/link I want to include a value for "pv0" so that the resulting report will display the contacts for only a specific account.
Before we can create the custom button/link we need to have the Id for the report we just built. So navigate back to the report tab, click the report you built and copy the actual URL of the resulting report page. The URL for my report is "https://na1.salesforce.com/00O30000004yLAX" and the only part we are really concerned about is the 15 characters after the "salesforce.com" portion of the URL.
Now navigate to the custom buttons & links area of Salesforce for your Account object. Setup > Customize (under App Setup) > Accounts > Buttons and Links. Click the "New" button next to the "Custom Buttons and Links" section of the page. The resulting page will prompt you for a number of items:
Now add the new link to your page layout, navigate to an Account (preferably one with related Contacts) and click the link. You’ll see that the generated report actually grabbed the Account Id from the URL within your custom link and used that as the value within the condition we built into the report itself.
By passing the report criteria/condition value in this manner we are eliminating the need for multiple reports to display account specific details. We can have a single report that is relevant and flexible enough to be accessed by anyone in the Salesforce org without having to worry about the maintenance that would be required by building one off reports for all our accounts or instructing end users how to manipulate the reports themselves.
As I mentioned at the beginning of this post, this functionality is pretty powerful and can be useful to almost any Salesforce admin. I’m fairly confident that almost any admin has a custom or standard object where this concept could be applied quite nicely.
I am eventually going to do a deeper dive into this topic in another post because this is only a fraction of what can be done when you truly begin to grasp the functionality at hand.
Author

I've been working with Salesforce since 2003. Over the years I've held various roles for diverse salesforce.com customers, created a Salesforce specific ISV, founded a few start-ups and built numerous applications for the AppExchange. All of these experiences have allowed me to learn quite a bit about building on the platform.